

Hi everyone! I had the amazing opportunity to attend the Missouri Star Quilt Company Birthday Bash in Hamilton, Missouri this past week and it was a blast! Aside from just having a great time, my main responsibility was to demonstrate a fun project using my Flutter and Shine fabric collection for Riley Blake Designs. After much deliberation and project auditions, I settled on a pincushion- perfect for a fast project, and cute enough to get people to stay a while!
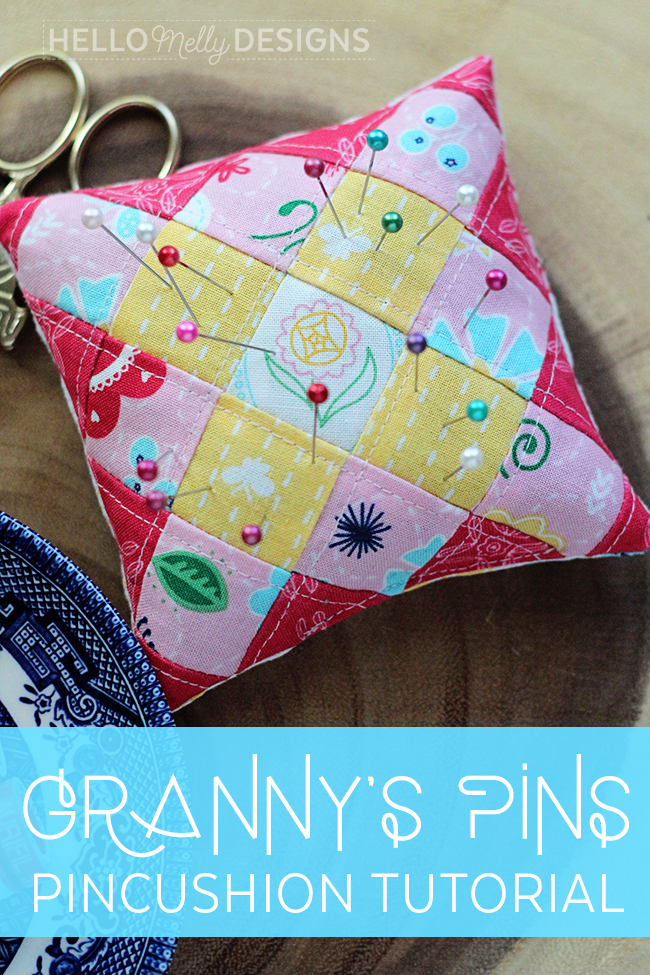
The granny square quilt block is the fabric version of the ages old crochet motif. The whole look can change depending on your fabric choices and placement! This pincushion is just a simple arrangement of 1.5″ squares, using only a few fabric leftovers.
Have extra 5″ squares from your charm packs or 5″ stackers? You’ll need (6) 5″ squares for this one, 2 of them should be the same print for the background (or outside) row.
From the background Fabric, cut (12) 1.5″ squares
From Fabric 1, cut (1) 1.5″ square.
From Fabric 2, cut (4) 1.5″ squares.
From Fabric 3, cut (8) 1.5″ squares.
From remaining square, trim it to 4.75″ x 4.75″.
You’ll also need pincushion filler- I used ground walnut shells purchased at the pet store (it’s used for desert pet cages). I did lots of research before choosing that specific filler, and it has been wonderful! The feel of it is amazing, lots of good weight and the pins slide easily in and out. It also doesn’t retain moisture (in a regular home environment) so your pins won’t rust. Plus, it is cheaper than other options and you get tons of it!

(I have different fabric arrangements in the following photos, since I had the pin cushions in different stages of completion for this tutorial. Don’t be confused 😉 but use them for inspiration on what fabric combinations you’d use!)
You’ll arrange your prints into “granny formation,” and then sew into rows. Press the rows so that they are going in different directions, so you can match seams easier when you sew the rows together into the pin cushion top. Sew those rows together, and press away from the center row.

Now it is time to trim the extra- make sure you leave 1/4″ from each seam so you don’t lose your points! Trim to 4.75″ x 4.75″.

Sew the remaining square RST to the pieced top, leaving a 2″ hole for turning later. Trim the corners to reduce bulk, and turn it inside out. Fill with the ground walnut shells, and stitch the hole closed! That’s it, you are done!

At Missouri Star, I had a handout for the folks who stayed for my demonstration but ran out by the second day! I promised everyone I’d have a mini tutorial and the handout available on my website, which means that EVERYONE can have it! Yay! Snag the PDF below, it is printed on one page so you can fold it into a little 1/4 page booklet.

This project is perfect for swaps, quick gifts, and when you just need a quick-finish project! Make it as fancy as you like- fussy-cut your pieces, add quilting, or whatever makes you happiest!

Download the pattern HERE: Granny’s Pins pincushion pattern Printable
(for personal use only, feel free to share the link but don’t redistribute or sell this pattern)
Very sweet! I have a half dozen of these blocks made last year just waiting to become pincushions someday. Maybe, after seeing yours completed, that day has come!
Thank you..I love pin cushions. Have way to may. Lol but I will make this for sure 🧵✂️🧵✂️🧵